
When is the last time you made a gorgeous burlap wreath? If you can’t remember, it’s time to get out your supplies and make a burlap wreath that will draw every eye to itself. If you follow home décor trends, you must know that burlap has been popular for a while. It’s used in home interiors and even in weddings. If you love natural colored burlap but want to try using colored burlap ribbon. Follow this burlap wreath tutorial for the best outcome.
How to Make a Burlap Wreath with Colored Ribbon
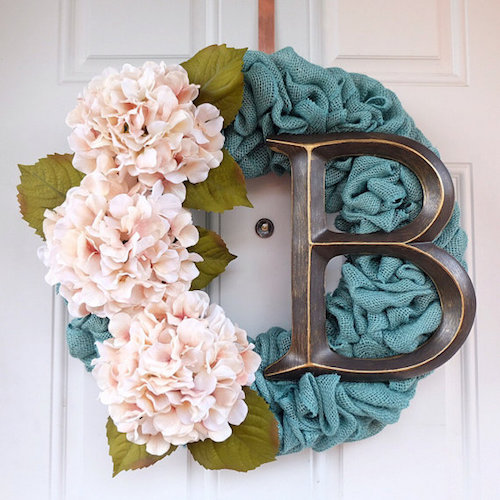
Image via: Etsy – All Doors Wreaths – Colored Burlap Ribbon Wreath
Wreath Making Supplies
12-inch wire wreath frame
12 pieces of pipe cleaners (or strings of jute twine)
Colored burlap ribbon (5 inches wide, 10 yards long)
Your color choice of wired ribbon or artificial flowers
Burlap Wreath Tutorial Video:
Wreath Making Directions:
- Unroll a few feet of your burlap ribbon. Fold it in half and secure it to the wreath with a pipe cleaner or jute twine.
- Loop the burlap through the wreath’s inner section and then back again. Flip the wreath frame over and secure the burlap again with the twine (make a loop and knot it to secure).
- Loop the burlap through the inner section and cover the knot. Loop it again through the middle section of the wreath. Make a third loop on the third section of the wreath.
- Push the loops to make sure they are even.
- Repeat this process again to make more burlap loops.
- Secure the burlap ribbon after making 3 rows of 3 loops.
- When you get to the end of the wreath frame, pull the burlap ribbon through to ensure there aren’t any gaps.
- Cut the burlap ribbon and secure it with jute twine.
- Make a loop with the wired ribbon. Twist it and make another loop. Repeat this process to make 4-6 more loops. Secure the loops with a pipe cleaner. Spread out the loops to make them fluffy.
- Secure the ribbon to the wreath with a pipe cleaner.
![]()
Image via: Etsy – Contemporary Crafting – Burlap Ribbon Wreath
Make A DIY Burlap Wreath
Instead of rushing out to buy a spring wreath, try this DIY burlap wreath that is easy to make and also easy on the pocket. You can try the project with your friends or your kids. Without a doubt, your kids will be excited to be included in your project.
For more burlap wreath ideas visit our burlap wreath DIY category!
What a lovely wreath! I love the variety and floral touches to the burlap. Just beautiful!
This is a fabulous tutorial!
Thank you for joining us and sharing at Thoughts of Home.
We are so glad you are here!
Laura
White Spray Paint
Adorable!! Burlap is still a favorite of everyone.
Happy Thoughts of Home. Pinning. 🙂
I know right Stacey? It’s like I can’t get enough burlap and succulents… hmm.. could be a cute blog name 🙂
What a beautiful wreath! Thanks so much for sharing this at TOHOT.
You’re welcome thanks for the great time Angela!
I am a wreath maker too and this is one adorable wreath!
So glad that you shared this with us at TOHOT!
Thanks so much, pinned too:)
Jemma
Thanks Jemma, the burlap ribbon in varied colors are gorgeous right? 🙂
This wreath is adorable I love that shade of blue next to those hydrangeas. This is very delightful.
What size letter did you use in this wreath?
Hi Courtney, we don’t make the wreaths personally. We link to Etsy Owners who make the wreaths, so only they could tell you how large the letter is. Thanks for visiting!
how many rolls do you use to make 18 inches wreath
You can use 2-3 rolls per wreath. Depending on how puffy you would like them to be! 🙂