
There is always an occasion to give you an excuse to make a gorgeous wreath for you home. It can be a special celebration or an everyday décor improvement. So here is a way to make a basic circle burlap wreath which you can adjust to any circumstance by either changing the color of your burlap ribbon, by using more than one color or simply by adding some distinctive embellishments and decorations to your wreath.
How to Make a Swatch Burlap Wreath (Video)
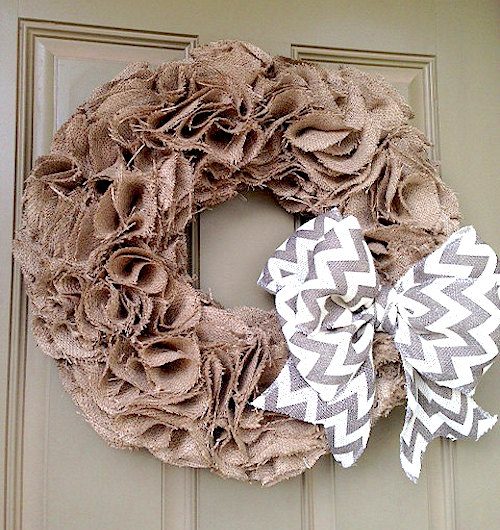
Create this “flower petal” effect by using circular burlap swatches
Image via: Etsy – Shabbie Chic Home – Burlap Wreath
Burlap Wreath Supplies
- 1 1/2 – 3 yards of burlap ribbon
- 12″ round foam wreath form
- Scissors
- Hot glue gun and glue sticks
- Round object (cookie cutter, drinking glass etc.) to use as a template or circle die cut (3 or 6 inches)
- Ribbon or twine for hanging or metal wreath door hanger
Watch a burlap wreath tutorial video on how to make a Burlap Wreath (in this video she uses squares of burlap, but you can use circle ones the same way)
You can find the link to the video here
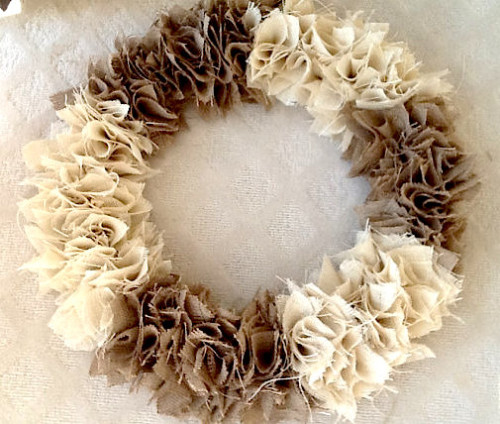
Use square, triangular, or circle burlap swatches for different effects
Image via: Etsy – Citrus Quilts… – Burlap Swatch Wreath
Instructions:
- The first step is the most time consuming. You will need to cut out a lot of circles out of your burlap. Use the template to cut the 3 or 6 inch circles (depends on the look you are going for, the smaller circles will get you a more even look, while the bigger once will look wilder). If you find it helpful use a pen to draw the circle first and then cut it out.
- To make the ruffles take one burlap circle and fold it into half. Now fold it again lengthwise. Add a small amount of glue inside of the fold, near the bottom in order to hold the shape you created together. Continue making a lot of ruffles.
- When you’re done, glue each ruffle onto your foam wreath in order to fill every part of it (inside and outside, but you could leave the back clear to be able to hang it nicer). You don’t need to be careful with the spacing, but keep the ruffles about half an inch apart of each other for a nicer result. You can fill the wreath with more or less ruffles, just as you like it, but make sure that no blank spaces can be seen. Trim any loose ends for a smoother finish.
- Adorn your wreath with embellishments or leave it as it is and hang it with ribbon, twine or fabric. That’s it!
This project will give you a jaw-dropping result as the final wreath looks absolutely stunning. If you don’t want to waste time to cut out circles, you can just cut out squares and fold them twice, like the circles. The end result will have more peaks then if you would use circles, but it is still stunning and saves you a lot of time!
Try this multi-color burlap wreath tutorial too!
Pretty! Looks like it takes a bit of time, but worth the effort! Love that chevron bow, too.
I am co-hosting the #HomeMattersParty link party this month and would love to have you stop by for a visit. The door opens for the next party Friday at midnight! http://www.alaynascreations.co
So pretty! Thanks for sharing your fab tutorial on the Monday Funday Party! XO
Thanks for having me Pauline!
Such a great burlap wreath! I really like how you used cut burlap instead of weaving one big burlap piece. Thanks so much for sharing your wreath @ Dream. Create. Inspire. Link. I hope you will join us again tomorrow night @ 8 EST. Take care, Tara
Thanks Tara! There’s so many different types of burlap wreaths. We’re glad you enjoyed it 🙂